I told you yesterday I couldn’t guarantee you wouldn’t get a recipe today ;).
Hahaha I warned you 🙂
So the last couple weeks I’ve been working on my husbands 1 year anniversary present. I know that it is still just over a month off, but it’s just over a month off. It has taken a lot of thought to come up with something for him, that he’ll love, that he doesn’t know about (got his Father’s Day present in April, his birthday present on Father’s Day and his Christmas present in July, what can I say I’m working ahead of the game, but that’s just how it works sometimes) and keeping that a secret from him. I’m kind of on the almost last step of it! Just a little more to go. I see the end in site! Then I have to figure out where to put it so he doesn’t find it!!
Anyway…. I got carried away there I think…
So if you aren’t from the 4-State area (aka SE KS, SW MO, NE OK, NW AR) maybe you’ve never heard of Cafe Del Rio. They serve Tex-Mex and all I can say is they have some amazing cheese dip. A few years back I ran across a recipe that claims to be Del Rio cheese dip. If it isn’t… it is so dadgum close that it has me fooled!
Del Rio Cheese Dip
2 1/2 lbs white American Cheese (I used 2 lbs American, 1/2 lb Monterrey Jack)
1 pint half and half
2 small cartons whipping cream
1 box frozen spinach (thawed & squeezed out)
12 oz jar jalapeno (drained)
Add the half & half to a pot over medium to medium high heat.
Add the cream.
Smile for the camera (oh wait that might not actually be part of the recipe)
Add your Monterrey Jack (if you choose to use it like I did.)
And American cheeses so they’ll melt into the half & half/cream mixture. (I actually used singles and unwrapped them all, it was cheaper that way… but you can buy the block and cut it up, that’s always faster.)
Dice the jalapeno’s. I only used a handful (not the full jar like the recipe said) and it added a bunch of heat!
Drain your thawed Spinach in a clean kitchen towel.
And then use the chopper, chop the spinach and add to the cheese/cream/h&h mixture.
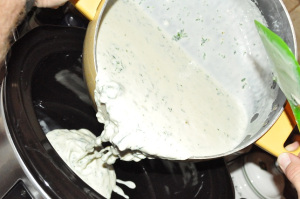
Stir together and you are ready to rock ‘n roll. I put mine in a crock pot and took to a friends house.
Serve with Tortilla chips 🙂
I took it to a friends house over the weekend where we got to do more of this!
And watch more of these!!
Happy Friday Eve!
Del Rio Cheese Dip
by Nicole
Keywords: stove top appetizer snack cheese spinach half and half jalapeno American Mexican
Wow, I’ve never done this… and I can’t guarantee I’ll do this again… But I was feeling extra spunky I guess…
That and I didn’t think you wanted another recipe post, however right now, that’s one of the biggest things going on in my life it seems like and therefore, I have lots of recipe posts :).
Anyway if I could have it my way, I’d wear jeans every day, but at work, that isn’t an option. You have to dress up 4 days a week… I could wear dress pants, but I hate wearing dress pants, I guess the winter does that to me, so in the summer I dress in dresses, skirts & Capri’s a lot.
Here’s one of my work outfits 🙂
So I can’t promise tomorrow you won’t get a recipe post :)…
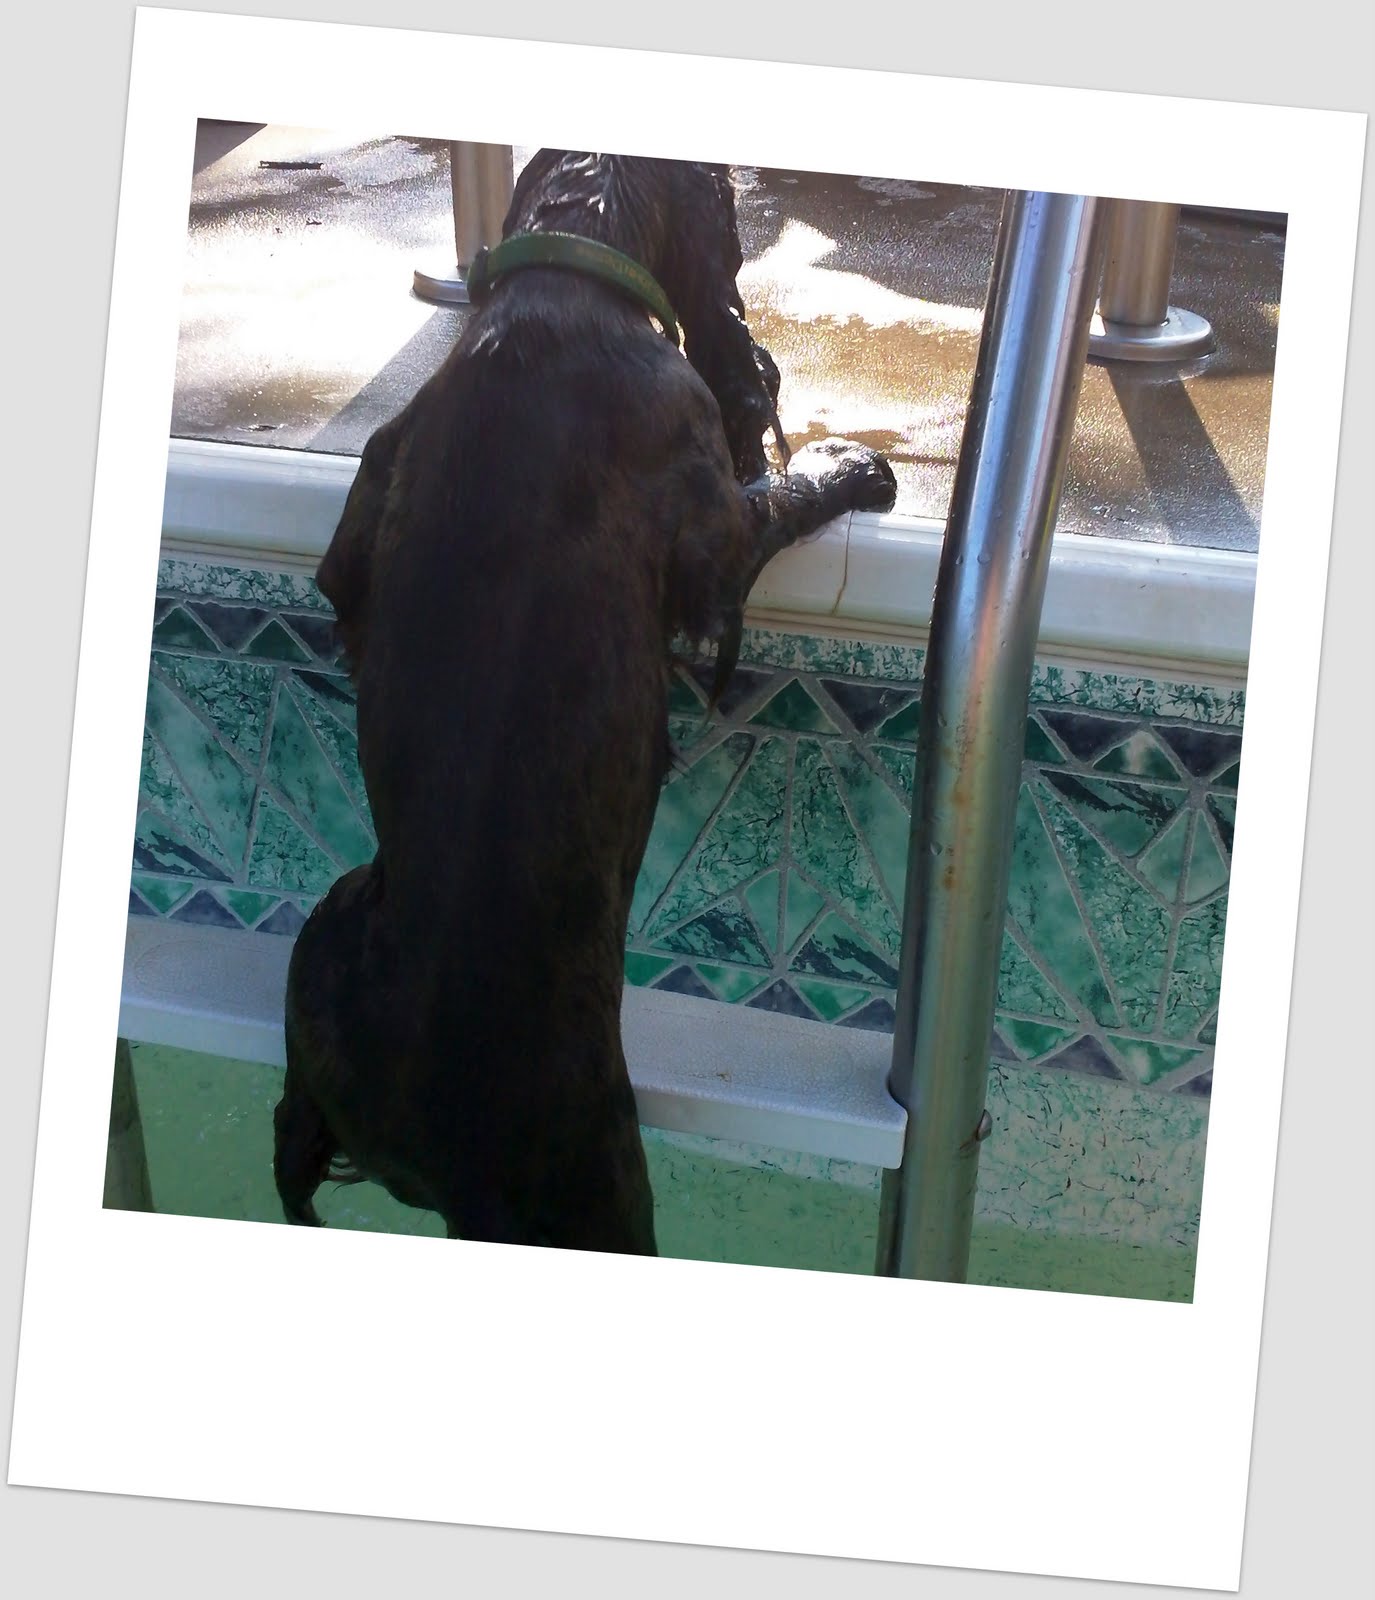
There are breeds of dogs who LOVE the water, and then there are those who don’t!
I’m not really sure about the Cocker Spaniel breed… I know my Cocker when I was a young kid would jump in the pool after me if I coaxed her or she thought I was in trouble. But at that, she learned a very valuable lesson, how to swim to the ladder and either get out or cling on until someone could come get her.
Well our current pool is an in ground pool but it has a liner. Last fall a glass candle got broken in the pool so this spring we drained the pool completely and used the shop vac to make sure there wasn’t still broken glass in the deep end. Good thing too, because there was :(, hubby cut his foot on it. So anyway we got that all cleaned up and started adding water to the pool again, but apparently not fast enough.
The Thursday night before the 4th of July and our party on the 2nd, we noticed the pool had a slow leak. We finally noticed there was a big dumb hole in the liner :(. It had dry rotted while filling it back up :(. Bummer. Then the whole water debacle of our party weekend… I can tell you, the darn pool has been frustrating!
But since the pool liner is bad, we figured now was as good of time as any to make sure Audrey knew how to swim and either cling to the ladder or crawl out in case she ever falls in… which she fell in on the pool tarp over the winter, but there was enough there she could stand on… unlike the pool being completely un-covered.
So I got in the shallow end, and had hubby “throw” her in the deep end. (he didn’t really throw her, but helped her in)
And I stood in the shallow end coaxing her to me.
I can tell you, she doesn’t like water.
but she finally got the hang of “doggy paddling”.
And I swear right here she’s telling me to “Eat Dirt”
but isn’t she cute!
Then I had her swim to the ladder and work on getting herself out.
It worked too 🙂
Except for this round. She swam about 4-5 times to me.
And time to shake it off! And run away from the crazy man and the crazy camera lady.
Right now, this is what our pool looks like… It’s really sad!
So the other weekend we BBQ’ed some chicken. I had the husband bbq it all up so it didn’t go bad. So then I was left with a bunch of chicken that we didn’t want to eat as just plain chicken. So I made some good ole Chicken Enchiladas and you talk about GOOD!
Chicken Enchiladas
Ingredients: 2 cups cooked shredded chicken 1 can Rotel 1 can green chilies Course black pepper to taste
Directions: I had left over chicken that had been on the barbeque the night before so I figured bbq’ed chicken would be fantastic, but any type of chicken you wish, just shred it up and add it to the bowl.
Add 1 can of Rotel and black pepper to taste. I actually left out the green chilies partially because I didn’t have them, but I lucked out b/c my Rotel said it included green chilies. Score!
Mix together.
I had a block of Salsa/Cilantro cheese in my fridge so I figured I’d grate some of that up and add to the mix. YUMMO! yeah, it was good!
I added some of the cheese even to the mixture. IMO, you can never have enough cheese!
Then pour some of your Enchilada sauce in the bottom of your pan. This was store bought, however I found a recipe last week on how to make your own. Now if I could just remember where I found it…
Lay your tortilla out on the cutting board. Place a little of the mixture down the spine of the toritlla (that’s the center for those of you who don’t know :)… I’m just trying to help!)
And Roll’er up! (why yes, I do speak Ozark Hillbilly, thanks for asking… LOL)
Then place your tortilla seam side down into the Enchilada sauce.
Once you have all your enchilada’s in the sauce filling the pan, then cover the top of them with remaining red sauce. (red sauce=Enchilada sauce… just keepin it real folks…)
And top with some of your remaining cheese! YUM!
I almost forgot to take a picture of the finished product. I was hungry and they looked/smelled so good! So here’s what was left as leftovers that we ate 2 nights later.
But what gets better, is having a good warm gooey dessert! I actually made these at a Sunday night dinner. They are so good and warm and gooey and 5 ingredients. That’s it! Talk about super simple. Make them up and pop them in the oven just as you sit down for dinner and when they come out, dinner should be finished and you’ll be the hit of the show!
Now please ignore the quality of photo for the Banana ravioli’s because I forgot my camera and was using my iPhone to take the photos 🙂
Caramel Banana Ravioli
Ingredients: 2 cans of Crescent Rolls 24 Rollo’s (although I wasn’t paying attention and only took 12 with me that night) 2 Bananas Caramel drizzling sauce Sugar
1st, lay out 1 of your crescent rolls; pinch all the seams together so that it resembles a sheet of crescent roll.
2nd, peel and slice your banana’s. Now the recipe says 24 pieces, however, I can’t get 24 pieces on 1 crescent roll. I think there were 16 pieces here but I had some Larger sized banana chunks.
3rd, Unwrap your Rollo’s and cut them in half. Then place 2 pieces on top of each banana. Now remember I only took 12 with me so some of my bananas only got 1 half of a Rollo.
4th, Cover the banana/rollos’ with the second crescent roll.
5th, Use a pastry wheel and slice down between the banana/rollo’s to form Ravioli’s. If you are lucky, your pieces will seal. If not, make sure to pinch the sides together so you have little pillow’s or “Ravioli’s.
6th, Bake in a 400 degree oven for 10-12 minutes or until lightly golden brown.
7th, Pull out of the oven and drizzle with the caramel sauce and shake/sprinkle sugar over the top.
Can I just say YUMMO! It’d be a great project for the kids to help you with also 🙂 It’s always best to get the kids in the kitchen young!!
Chicken Enchiladas 2 cups cooked shredded chicken 1 can Rotel 1 can green chilies Course black pepper to taste Cheese
Mix first 4 ingredients and a handful (or 2) of the cheese together. Place a small amount of Enchilada sauce on the bottom of baking pan, enough to just coat the bottom. Stuff mixture into tortilla, roll up and place seam side down in the Enchilada Sauce. Top with enchilada sauce and shredded cheese. Bake at 350 degrees for 30 minutes.
Caramel Banana Ravioli
Ingredients: 2 cans of Crescent Rolls 24 Rollo’s (although I wasn’t paying attention and only took 12 with me that night) 2 Bananas Caramel drizzling sauce Sugar
1st, lay out 1 of your crescent rolls; pinch all the seams together so that it resembles a sheet of crescent roll.
2nd, peel and slice your banana’s. Now the recipe says 24 pieces, however, I can’t get 24 pieces on 1 crescent roll. I think there were 16 pieces here but I had some Larger sized banana chunks.
3rd, Unwrap your Rollo’s and cut them in half. Then place 2 pieces on top of each banana. Now remember I only took 12 with me so some of my bananas only got 1 half of a Rollo.
4th, Cover the banana/rollos’ with the second crescent roll.
5th, Use a pastry wheel and slice down between the banana/rollo’s to form Ravioli’s. If you are lucky, your pieces will seal. If not, make sure to pinch the sides together so you have little pillow’s or “Ravioli’s.
6th, Bake in a 400 degree oven for 10-12 minutes or until lightly golden brown.
7th, Pull out of the oven and drizzle with the caramel sauce and shake/sprinkle sugar over the top.
In 1984 Ronald Reagan declared July as National Ice Cream Month with the 3rd Sunday being National Ice Cream Day. Hmmm… really? Why didn’t I know about this until now? I found out on Friday July 8th (I googled this to be sure after I found out!!)… so that means I was missing out on celebrating Ice Cream for 7 days, really? LOL.
So me asking for an Ice Cream Cake from either Dairy Queen, Culver’s or Shakes for my birthday (hint hint July 30th… hint!) isn’t totally wrong! Well it wouldn’t be wrong anyway but still, I like reasons to celebrate extra… LOL 🙂
I’m not gonna lie, my favorite flavor of ice cream is Vanilla Bean. I know, how boring am I! However… BlueBunny makes a Red Carpet Red Velvet Ice Cream that is to die for!
So Wednesday night we had the horse shoer come out to put new shoes on the horses. Now to them, it’s like getting a manicure and/or a pedicure. Usually you set it up so they have this done every 6 weeks, otherwise their hooves get a little long, you lose shoes, etc.
First things first, you need to take off the old shoes, if they’ve lasted the whole time… which isn’t always the case.
Then you use a hoof knife to clean out the hoof, and take off some of the rough edges.
Here he is cleaning around the “frog” If they are standing soft footed (no shoe) it should touch the ground. It is basically the shock absorber.
You may be asking what Mudflap is doing… He’s waiting for the “goodies” that come out of the hoof and part of the hoof clippings to naw on.
Then you use the nippers to trim back the long, dead hoof, basically like trimming your finger and toe nails.
And Miss Millie found some goodies to chew on now!
Then use the hoof knife to trim up some of the rough edges.
Now it’s time for the rasp. This is basically like a nail file. It smooths the edges and makes the sole of the foot level for the shoe to sit on.
Now it’s time for the first fitting. Make sure you have the right sized shoe, etc.
It’s very close, but sometimes you have to beat it a little wider, take out a rough spot, etc. Some horse shoers use premade shoes, others make their own.
Once you have the shoe the right “size” it is time to nail it in place. Usually that requires 4 nails on each side, but nails are expensive, so usually a farrier will only put on 3. If they’d put the 4th (on each side) the shoe would stay on longer… The shoes usually have holes in them so you get the nails in the correct place on each side.
So one thing about the shoe nail is they are flat on one side and curved on the other so that when driven into the hoof they curl out the topside so that they don’t go into the foot. If they go into the foot, it’s very similar to hitting the quick of your finger nail but it will cause major problems.
Once you get the nails driven in, the sharp side is poking out. You use the back of your hammer to bend them off. Just twist it around and they break right off.
Then you use your rasp to grind down the rough edges of the nails and make sure the hoof is even with the shoe.
This tool here, called a clench, helps curl the nails around the hoof to basically act like a hook to keep the nails from pulling back out the bottom.
Once he’s done he puts some hoof conditioner on the hooves (you know, lotion :))
And baby girl is all set.
I think she even offered him a back scratch for his good work… LOL
I have actually seen horses be a “pick pocket” while a farrier was working like that. It’s rather funny!
After the hay was in the barn, we headed home, pooped!
***Enter in Sawing Logs (aka zzzzz’s, snoozing, sleeping, dreaming)***
Now, very seldom is the telephone ringing at 6am a Good thing.
Or so it seems anyway…
Some days it IS a good thing.
Especially in the case of yesterday morning at 6am.
So let’s play this out a bit…
6 am – Husband’s alarm goes off. 6:01am – Husband reaches to turn alarm off. 6:05ish am – Telephone rings. 6:05:01ish am – Wife is tangled up in the sheet/comforter and trying to get out of bed 6:05:01 1/2ish am – Husband jumps out of bed to find the telephone.
**Phone gets found** by Husband! Wife is still trying to figure out how to get out of the sheet entanglement (lol)
Wife rolls back over and tries to go back to sleep… although in the back of her (my) head knew she (I) shouldn’t, not just yet.
But this is what my dad walked out to when he went to feed critters yesterday morning.
That’s pregnant momma with baby! aka no longer pregnant!
Our New Mare had a colt by her side. A Palomino baby at that!!
At this point no one knew if it was a Stud colt (male) or a filly (female)
So my mom I guess got dressed and went to help my dad get the mare and baby into a pen, but 2 of the other mares she was running with weren’t being of much help. So momma mare kicked at the other 2 and grazed my mom’s hip. I guess she has a fairly decent sized bruise now :(.
Anyway they got the mare and baby separated off. My mom is happy that the Momma Mare is so protective of her baby :).
So back at our house, Hubby comes running into the bedroom, grabs his clothes, his camera, kisses me and is out the door to my parents house. I on the other hand figured if he was going to get pictures, my bed was calling my name (even though I really needed to get up as well).
Just before I left for work, I got not 1 but 2 text messages saying the baby is a Palomino Filly.
Then I came to work to these photos from hubby.
Of course it was raining, but I don’t think any of us complained about that. (that’s just a side note).
So when I was leaving the house, I grabbed clothes that weren’t work clothes so that I could go out after work to see the new baby. She is an absolute doll!!!
Anyway, back at work, I get my first email from my dad:
Dad: 7/13/11 8:18AM: I am the first person to touch her!!!!!! Nanner, Nanner, Nanner!!!! Me: 7/13/11 8:19AM: I was the first to touch Squirty 🙂 =P (that is my dad’s baby!) Dad: 7/13/11 8:19AM: But I was the first to ride her!!!!!
Then later in the day another email floated in:
Dad: 7/13/11 2:11PM: There is a Palomino Filly at my house with 3 white feet up to the knee, one white sock and a full blaze face that is less than 24 hours old. Jealous yet? Me 7/13/11 2:11PM: Haha…. She’s out of a mare registered in my name… jealous yet? Dad: 7/13/11 2:54PM: Your Name???? Me: 7/13/11 2:54PM: Ok fine hubby’s name.
To be honest, I’m not sure who’s name she was registered in…. She’s a partnership for hubby and dad… but I know she’s either in hubby’s name or his and my name… I’m not sure how he did it :).
So anyway after work I went out and got a few more shots of this new cutie!
So now comes the fun of trying to come up with a name… Wish us luck!
This isn’t a traditional Fettuccine Alfredo. I’ve read that a traditional Alfredo sauce is just butter and Parmesan Cheese. One of these days, I’ll try that but for now, I’ll stick with this yummy sauce.
Here is my first attempt at the sauce… Don’t be fooled, I can’t always cook apparently 🙂
Cook the pasta according to the directions on your package. (but remember to start a large enough pot…)
Cook up your chicken into either strips or bite sized pieces. (we cheated b/c we grilled chicken the night before and I just used that.)
Place your chicken broth into a large pan.
Add 4 tsp flour (don’t grab the tablespoon and use it like I did… woops… I wasn’t paying attention and my sauce was THICK!)
Mix the flour in with a whisk, then add your cream cheese.
Whisk it around until it melts into the chicken broth/flour mixture.
Then add your seasonings. (At the last minute I decided to use another seasoning from my mom’s recent trip to Chicago when she brought us back all those seasonings)
I always heard/read with a cream sauce to add some Nutmeg also so that’s what I did (just don’t add a smidge to much). Since my seasoning had black pepper in it, I left that out.
And then… I added Mushrooms. I like them… so what! 🙂
Then top it off with the Parmesan Cheese so that it melts in there.
Toss in your pasta (that apparently didn’t get cooked all the way), add your chicken and you are ready to rock ‘n roll!
I meant to add a little of the starchy pasta water to thin out my sauce, but didn’t tell hubby and it got dumped out before I could. Oh well… it was YUMMY!
I think we should rename this Chicken Fettuccine Gravy 🙂
Cook the pasta according to the directions on your package.
Cook up your chicken into either strips or bite sized pieces. (we cheated b/c we grilled chicken the night before and I just used that.)
Place your chicken broth into a large pan. Add 4 tsp flour. Mix the flour in with a whisk, then add your cream cheese. Whisk it around until it melts into the chicken broth/flour mixture. Then add your seasonings. plus add some Nutmeg since it is a cream sauce. Then top it off with the Parmesan Cheese so that it melts in there. Toss in your pasta, add your chicken and plate it up. If your sauce is a little thick, thin it down with some of the starchy pasta water.