Everything's Better with Butter – A Butter How To

On Monday I told you I ran across an idea to make homemade ice cream in plastic baggies.  And if you’ll remember on Friday I bought raw milk.  So this leads into today’s post…

When I ran across how to make ice cream in plastic baggies I also ran across making butter in a Quart canning jar.  Well I really thought I was going to have 4 kids at my house most all day Saturday, but they were only there like I said Monday for a couple hours.  Yeah, they swam the whole time.  So anyway I went ahead with plans with Tbug :).

Well since we had the raw milk and hubs supervisor told him that if you left it standing in your fridge over night that the cream would float to the top, I knew no matter what we were making butter.

Have I ever made butter?  Nope.

I have always heard that making whipped cream if you go to long you’ll make butter but that was my knowledge on making butter.

Oh. My. Gosh. is it easy!  Takes a while but EASY!

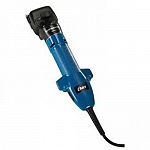
We didn’t go the quart jar method, nope, we used my Dazey Butter Churn.

Mainly because that’s how they made it back around the turn of the century, I had one, never used it and wanted to try it out.

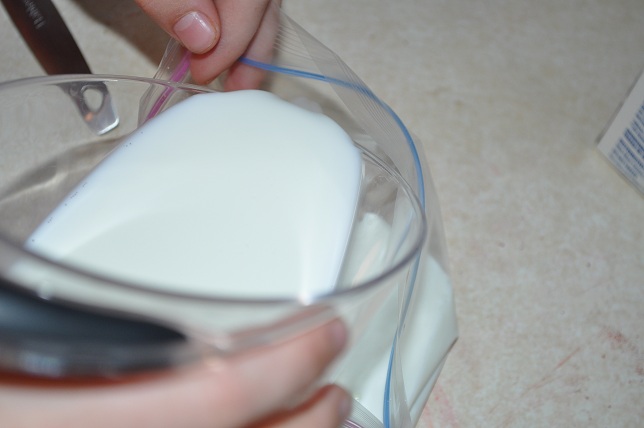
So what you do is pour the cream in the container.

Place the lid on and go to stirring.

As you crank a paddle in the jar stirs the cream.  I read you want about 80cranks/minute.

So you crank and crank and crank.

And then you pass it off to the next person to crank some more.  (btw, that’s when you go make ice cream and leave hubby cranking, I’m just saying)

 And eventually hubby gets tired of cranking too (you know after about 20 minutes) so you employ the mixer.

And it eventually starts to look like this.

And now that you are getting closer to actually making butter the liquid starts splashing and you get it on the counter and the spices and the wall and the cabinets so you place a towel over the mixer. And if you look at the left side of the mixer, there is so much liquid that it starts running down the towel and forms a puddle on your counter.

At that point you drain the milk off the butter.  This is in fact butter milk.  Save it.  Use it.  Enjoy it!  So then you place your bowl back to the mixer and let it run a few minutes longer to try and make sure you get all the milk out of the butter.

Once you have it all out, drain the butter again.  Now run water over the butter, stir, drain and repeat.  That just cleans the butter and gets rid of the excess milk that may not have drained the first time.

And when you are finished, you have butter.

What do you do with Real butter?  Oh you make cookies.  You put it on toast.  Some people might even eat it raw… I’m not sure that is me though.

Have you ever made butter?  Have you ever wanted to?  I might be hooked.  Although I’ve found a few tips like cut down on the cream to start with, and do it in a couple batches.  Might make it less messy!  If you try this, please let me know what you think!

Marlee's Creamery – Raw Milk

It is officially the 1st day of:

Last Friday my hubby and I ran to the Farmer’s Market on our lunch hour.  It wasn’t really an intentional thing, but we wound up there.  A few weeks ago we went looking for Marlee’s Creamery, a local dairy farmer who raises Jersey cattle.

They weren’t there that day, but we lucked out because this particular Friday, they were!!  Well of course we bought some “Raw Milk”.  What is Raw Milk you ask?  Raw Milk is milk that has not been pasteurized or homogenized.

Oddly enough, just like never having farm fresh eggs, I’ve never had farm fresh milk either.  My grandparents got out of the milk business back around the time my dad was still in high school.  They went to beef cattle then, but my dad always said there wasn’t anything better than milk straight from the cooler (you know after it came from the cow).

I guess I should mention I did try “raw” milk one time… so I can’t say I’ve never had it, but it was while in Costa Rica, I had just milked the cow and they didn’t chill it.  I about threw up.  But that may be TMI….

Circa 2002

Anyway, When we bought the milk they gave us a cute flier.  I thought I would share some of the facts that were included about “Raw Milk”.

Did you know…

~Fresh raw milk, from cows eating well-manured green grass is a living unprocessed whole food.
~ The butterfat of whole raw milk has a cortisone-like factor that helps prevent stiffness in the joints
~ Raw milk contains beneficial Flora as well as lactic acids that allow this beneficial flora to implant in the intestines (www.westonaprice.org)
~ Retail raw milk is even safe for babies!  When buying from Marlee’s Creamery, you can be sure that the cows are on pasture and the barn is kept clean.  The milk goes directly from the milking machine into a stainless steel tank and is kept chilled.  Raw milk is a healthy and safe food for all members of the family.
~ Supporting the local farmer supports your local community.  For every $1 earned on the farm = $5-7 for the local community.  Raw milk sales (and other local produce sales) hold the potential for a HUGE rural revival.
~In studies involving humans, raw milk was shown to be superior to pasteurized in protecting against infection, diarrhea, rickets, tooth decay and TB; and children receiving raw milk had better growth than those receiving pasteurized milk. (www.realmilk.com)
~Three studies in Europe found that drinking “farm” (raw)milk protected against asthma and allergies.  (Lancet. 2001 Oc6;358(9288):1129-33; JAllergy Clin Immunol. 2006 June;117(6):1374-8; Clinical & Experimental Allergy. 2007 May: 35(5) 627-630).
~MODERN ADVANTAGES: Compared to 50-70 years ago, Marlee’s Creamery today can take advantage of many advancements that contribute to a dramatically safer product including pasture grazing, effective cleaning systems, refrigeration and sophisticated milk and herd testing techiniques.
~Some of the nutrients found in Raw Milk include: Vitamin D, Vitamin C, Vitamin B-12 and B-6, Calcium, Vitamin A, Folate and essential fatty acids.

I can tell you both the hubs and Tbug liked it, I’m not a white milk fan but I may just have to try it….  Also the hubs supervisor said that it tastes extremely good in homemade ice cream.  You can bet come the 4th of July Party this year, we’ll be making a trip either to the Farmer’s Market or to the farm.

I love buying fresh produce!  Farmers and the farming industry are becoming smaller and smaller these days.  It is really sad.  I like to help out our local farmers anyway I can.  If you ever get a chance to drink “raw” milk, go for it!  Farmer’s are what supply all your food and keep our economy running. 

The Ice Cream Project

What do you do when the temperature outside is warm?

Well you could go swimming.  Oh wait, you say you’ve already been doing that.  Or wait you don’t have a pool?  Well whatever, wouldn’t some nice homemade ice cream be good?

Oh wait, you don’t have an ice cream maker.  Well shucks, we’re striking out aren’t we…

Hahahahaha NOPE!  I have goodness of homemade ice cream for you.  And it’s only 5 ingredients plus 2 ziploc baggies.

I ran across this recipe somewhere and just knew that with a bunch of kids around, we had to try it.  Well turns out only Tbug and I tried it, the rest of our group had to leave to go to a birthday party, but heck we made it and PC, Tbug and I all three had some.  We were impressed.  In fact we were so impressed we had to share it with you 🙂  Hope you try this out.  It’s super easy and you’ll be glad you did!

Ziploc Baggie Ice Cream
Ingredients for Ice Cream:
1 cup Half & half (or you can use heavy cream), 1/2 tsp Vanilla, 2 tbsp Sugar
Ingredients for the actual making:
1 pint sized ziploc baggie (the snack size), 1 gallon sized ziploc baggie (the large one) 1/2 cup course salt or table salt, ice.

In Pint size baggie place 2 tbsp sugar

Add the 1 cup half & half to the mix.

Now here it is handy to have a couple extra hands.  Add your vanilla to the very full bag.  Then seal your bag and set it off to the side.

Now in your gallon sized baggie, fill it up halfway with the ice.

Then dump your salt over the top of the ice.

Place the pint sized baggie in the gallon sized baggie.

Seal it up.

And shake.

And shake some more

And when the bag gets to cold to hold, con your parents in to helping shake. (no that isn’t my hand, that’s hubby’s hand, I’m just sayin).  Continue to shake for about 5 minutes.  After 5 minutes, pull it out to check the firmness.  If it isn’t completely set up, place it back in and shake some more.  If you used heavy cream, it’ll take closer to 8 minutes or so.

Now that the ice cream is of the right consistency, take the small baggie out of the large baggie and quickly rinse it in cold water to get the salt off the baggie.

Add a spoon and you’re ready to eat!

We had so much fun making this but Miss Tbug had more fun eating it. :).  She was nice though and shared a bite with her daddy and me 🙂

This was:
Kid Tested & Daughter Approved 🙂

Ziploc Baggie Ice Cream
2 tbsp Sugar
1 cup half & Half (or heavy cream)
1/2 tsp vanilla extract
1/2 cup coarse salt or table salt
ice
gallon-sized Ziploc baggie
pint-sized Ziploc baggie

Mix the sugar, half & half and vanilla extract together.  Pour into a pint sized Ziploc baggie.  Make sure it seals tightly!

Now take the gallon-sized Ziplog baggie and fill it halfway with ice and pour the salt over the top.  Then place the cream filled baggie into the ice filled bag and seal.

Make sure it is sealed tightly and start shaking.  Shake for about 5 minutes (or 8 minutes if you are using heavy cream).

Open the gallon-sized baggie and check to see if the ice cream is hard, if not reseal and keep shaking.  Once the ice cream is finished, quickly run the closed pint-sized baggie under cold water to quickly clean the salt off the baggie.

Open the baggie, add a spoon and enjoy.

Happy Father's Day

It is:

Father’s Day

Happy Father’s Day to my Daddy:

And a Happy Father’s Day to my wonderful Husband:

And Happy Father’s Day to my wonderful Father-in-law

And I would also like to remember my Grandpa S & my Grandpa J (In that order) on this day for celebrating Father’s.  I hope they have Father’s Day in heaven because you deserve to be honored too!

I hope all the Father’s, Soon to be Father’s and so on have a wonderful Father’s Day!

So CA Girl introduced me to a new tradition, that she was also introduced to.  It is the Red Plate Tradition.

Basically anything special and anyone special you want to honor (birthdays, graduations, FATHER’S DAY) you let them eat off a red plate.  She googled it because there is a poem that goes with it and she shared the poem with me, so I thought I would share the poem with ya’ll.  I plan on starting this tradition every chance I get.

May today be one of many red letter days
Times you’ll remember in so many ways
This gift is a tradition for you to start
A gift of love, straight from the heart
On days that are special that you’ll want to
Recall
Set out the red plate to celebrate it all
Honor the person and their great feat
On this special plate, let them joyously eat
It may be a birthday, promotion, good grade
A Little League win or wise choice that was made
May your years together as husband and wife
Bring you countless special days throughout your life
These wonderful times will come and go
Keep the red plate at the ready as your blessings flow

Project 52: Fantasy

I would love to be here right about now, Greece
Taken by a friend’s cousin

This would work for me too, Hawaii
Parent’s trip to Hawaii in 2007

Or here would even work, Maine
Taken by my cousin and her husband.  They live in Maine.
Being in the pool would work, at my parents house.
Summer 2002, used self timer and dove in the pool real fast

Driving down a dirt road during sunset, Missouri
Taken one summer around 2004ish… I don’t remember, just a beautiful sunset on a dirt road

Or maybe a sunset in Hawaii??
Courtesy of my parents trip in 2009.

Baling hay even sounds like fun, Missouri
Taken last fall at our house, second cutting

Ok here’s my true photo for Fantasy.  This is at the hayfield we were at a few weeks ago.  I’ve always wanted Silo’s.


I know I don’t usually give descriptions but since I tried so many photos… I thought maybe I should 🙂

No Man’s Land

**I did not write this, Bruce Lauderdale did, but I don’t want to forget this writing either, so if you don’t want to read, don’t feel like you have to!  This is just for me to always remember!**

Every time I drive into No-Man’s land here in Joplin my one overwhelming, inescapable feeling/emotion is “There’s only 117/128/141/151/153 dead?”  This monster didn’t care what it ran into.  It tore a 3/8-1 mile wide swath 10 miles long clear through the …heart of town.  Within that zone 8000+ homes of all types were destroyed.  I don’t know how many places I’ve stood, spun 360 degrees, and can’t see a single undamaged structure… and I shake my head.  It wrapped the frame of a bobtail truck around a tree, blew a rubber garden hose clear through a tree trunk, twisted a 9 story hospital on its foundation, pried up manhole covers, then, when it got bored with that, started sucking asphalt pavement off the ground.  “Where were you?”  is all you have to ask to get stories, stories of being in Home Depot as the roof left; of rolling down the street in a car, hiding under the dash; of sitting in a concrete safe room, behind a steel door with four latches while the house vanished; and of feeling a house around four adults and two kids walk, one step at a time completely off its foundation.    And yet we only have 153 dead??  No mistake, each one of those deaths is a tragedy and the total will probably still grow but we should be burying thousands, not less than two hundred.  By all rights we should be dozing trenches, filling them with fifty unidentified, mangled dead, and then going to the next trench.

(more…)

Naked Sheep in da House

So when I joined FFA I knew absolutely nothing (ok I take that back, I knew what they looked like and what sound they made and how to spell it, but otherwise nothing) about sheep.  My first year was a HUGE learning curve!!!

In fact I slick sheared (shaved) my sheep with dog clippers for the first fair I went to.  I didn’t know any better and my Ag teacher at the time was at my house and that’s what she told me to do.  It works, but OH MY GOSH does it take forever!

So then I upgraded to a pair of these.

They worked great but still weren’t exactly what I needed.  They again still had their limitations.

Finally I got a pair of these. 

Now these are good for Breeding stock (so you can block), but for Market Lambs it still didn’t get the wool short enough.  For Market Lambs, you have to slick shear and the closer to the skin you can get, sometimes the better odds you have, not only because while at home it keeps them cooler so they eat more and exercise more without getting sick, but Breeding sheep they keep the wool on to hide flaws, Market Lambs, you have to have it short!

When there is wool on a sheep for showing purposes you can make a short bodied one look long, a skinny one look fat, a fat one look skinny, a rounded dock (their butt) look square (like it goes out straight and then drops off their back), etc etc etc.  Someday I’ll pull out pictures and maybe go into a little more detail.  I will also tell you that Oklahoma 4-H and FFA kids, whether showing Market Lambs or Breeding Sheep have to slick sheer all their sheep.  No exceptions.

Anyway I’m getting off my topic.  Finally a couple years into it (when my parents knew I was in for the long haul) they bought me a pair of Lister’sLister’s are what everyone uses for slick shearing their market lambs.  These things are a lot like dog clippers but bigger, faster and more powerful.  Yes I have clipped our dogs with them before… They are a lot more safe then the pair above… I’ve even laid them on my arm before to see if I could clip my arm hair… just making sure I didn’t hurt the sheep I guess. 🙂

About a month ago I sold off most of my sheep.  I kept 5.  The bottle lamb from this year, a ewe that is really special to me, the ram, and 2 other ewes.

So Saturday we decided it wouldn’t be feasible to pay the shearer to come out and shear off 3 of them, so hubby and I decided we’d do it.  I gave him the Lister’s and a few pointers and he went to town on the ram.  Unfortunately we still have to do 2 of the ewes because where I brought the ram up out of the pasture, those darn ewes wouldn’t come, even with me bribing them with feed :(.

And this one here (Mudflap) wasn’t helping me, along with Audrey.

I don’t have shears like the shearer does.  His motor hangs up high and you don’t have to worry about getting tangled up in cords or anything.  Nope, I have the Oster’s and the Lister’s.  So we place the sheep up on the sheep stand.  It’s a great way when showing to keep them up higher so you don’t break your back while fitting them up.  Fitting can sometimes take 4-6 hours per sheep.  Yes I have spent 6 hours on 1 sheep before.

My grandpa’s built my sheep stand for me.  I swear it’s sturdy enough you could put an elephant on it… So anyway you place the sheep on the stand, put his head in the head stand (just to help hold him) and you set in on shearing him.

Since we aren’t shearing him for show, it doesn’t really matter how good of a job you do.  Just make sure you get the wool off, that’s the main goal.   It also helps when slick shearing them to douse them with water first.  The clippers go through the wool a lot easier.  However you can’t sell wet wool… but heck… we wouldn’t have enough to sell anyway.  Not this year anyway.

And I’ll tell you, hubby was doing GREAT!!

I really think this ram has been shown before for as calm as he is.  The ones who are hardly touched are WILD!

Now the cool thing about this stand is it actually has a boat crank on it, so you walk the sheep on, place his head in the rack and then you go to cranking him up to the height you want him.  Then when you are finished you can either A) jump him down or B) lower him back down.  My other sheep stand my grandpa’s made me you have to jump them up and jump them back down.  That’s tough work if you have an uncooperative sheep!

I guess Audrey had had a busy day between the sheep gathering and the sheep shearing and the horseback riding because she laid down in the floor of the car and eventually went to sleep.

Usually she isn’t this calm

And very rarely does she ever do this.

So there you have it.  1 sheep down, 2 to go….

And on a side note, Tuesday night I shaved my puppy dog.  Doesn’t she look cute?  btw I think she’s part energizer rabbit b/c she wouldn’t stand still long enough to hardly get a photo of her.

**And No I didn’t get any money for talking about my Oster’s or my Lister’s but if someone wants to give me money, I sure wouldn’t turn it down :)**

Linked up at Farm Chick’s Farm Friday

Riding Horses with the Youngun

Sorry but you should know with me by now… I’m going into picture overload Mode.  I got picked on this weekend when I couldn’t find a photo folder on my laptop, but then they were like, nope I’m not making fun of you because you take photos of my kids too 🙂

So now you are going to get a lesson on saddling, riding and unsaddling a horse provided by the youngun.

1.  Get the halter.  Make sure you grab a halter and lead rope.

2.  Walk to Aloha’s stall so you can get her out.

3.  Put the halter on the horse.

4.  Lead the horse out of the barn to the trailer.

5.  Watch out for the crazy camera person who ran around you so she could get a different view 🙂

6.  Tie Aloha up to the trailer.

7.  Brush her off.  Make sure you get all the dirt off of her so she has a comfortable ride too.

8.  Don’t forget the other side and under her mane

9.  And don’t forget the legs, however never stand directly behind a horse, always stand off to the side.

10.  Place the blanket on her clean back.

11.  Grab the saddle from the trailer and look real cute at the camera person for help.

12.  Place the saddle on from the left side.  Tighten the saddle down on her so it doesn’t fall off.

13.  Get the bridle from the trailer so you can put it on her.

14.  Grab on to the reins and head to the round pen.

15.  Still walking to the round pen.

16.  Smile pretty so the dang camera person will get out of your way so you can go through the gate.

17.  Said camera person helps you on to the horse.  Now you are ready to go.

18.  Now it’s time to get to business.

19.  After about 1 1/2 hours decide you are finished riding and you head back to the trailer.

20.  Take the bridle off first and put her halter back on.

21.  Un-do the girth so you can take the saddle off.

22.  Laugh at Camera person who is trying to take a picture and pull the saddle off one handed while you hold the blanket so it doesn’t fall on the ground.

23.  Place both back in the trailer.

24.  Use the “scratchy” brush to brush her down after a good work-out.

25.  You can tell she likes it!

26.   Give her a treat for working so good.  Make sure when you give her a treat you keep your hand flat so she doesn’t accidentally grab your fingers.

27.  Untie her from the trailer.

28.  Take her back to the round pen to be turned out for the day.

29.  Take her halter off once you are in the round pen.

30.  Close the gate and then hook the halter back to itself.

31.  And return it back to the barn where you found it.

 32.  And you are finished for the day.

**Note: My parents never figured when they bought this horse that Aloha would turn out to be the kid baby-sitter that she is.  She takes such extreme good care of Tbug it isn’t even funny.**