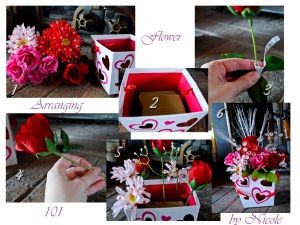
Floral Design 101
My first time through college, (boy it always sounds weird to say that!) I took a floral arranging class. In fact, I took 2. I heard it was fun and basically an easy A. Ok I’m not going to lie, I was bought by the “easy A” words. But it was awesome. In fact, it was so awesome that I took the second one. Unfortunately there were only 2 offered. Shucks, but how much fun~! If you ever get the chance, I would learn, although it isn’t difficult 🙂
And my mother, she checked my head and wondered if I needed to go to the doctor because I was sick. That was just something I didn’t do… LOL
There are so many different types you can do, Symmetrical, Asymmetrical, Large, Tall, dry, live, fake, focus on the front, make it the same all the way around, hanging on the wall, sitting on a table, monotone, bright, dull, ok the list goes on and on. You can even make wreathes which were awesome! I have to admit, the arrangement I did that I liked the least was the Asymmetrical arrangement. Sorry, I like symmetry in my life! Sameness 🙂
Anyway here are a few basic hints/lessons on floral design!
1. Choose the flowers you want. Always find a flower that will be the main focal point. In my case, I actually used the Red Roses as the main focal point.
2. choose your container and get some green foam. Now if you’re doing fake flowers, you use one type of “green foam” but if you are using live flowers, there is a special kind that you soak in water. Obviously my container wouldn’t hold water :), So then you need to decide if you want to glue the foam in or not. If you’re making a very top heavy arrangement, glue is necessary. Mine wasn’t all that tall so I didn’t glue it in.
3. With live flowers, our teacher told us that the leaves carry/hold bacteria so we always cut them so that the leaves never touched the water. That’s one hint in keeping your arrangement looking fresh longer. I guess I got so used to that b/c I always take the leaves off fake flowers too, can’t stand them. That’s just me and my preference. Also, remember to take the price tag off :).
4. Now you have a “naked” flower :). Cut your stem to the correct length. Remember if you cut it too short, use it somewhere else, it’s not rocket science. You can also, just not stick it as far in the foam. Both options work.
5. Figure out which flowers are the main focal point (my roses) and then make them where they cause the eye to flow through the arrangement. So basically, not all the same height. I had the “tallest”, although the focal flowers don’t necessarily need to be the tallest, then I shortened the left one a bit and finally the right one was shorter. Movement + flow = Nice.
6. Then place your filler flowers/jewels in to accentuate the “focal” flowers. Some taller, some shorter, some medium. Use your creative eye. And if it comes down to it and you don’t like it, pull them out and either start again or get more foam and then start again. Actually in this one I hung some of the green leaves over the side for additional color/depth. See, it all works out in the end :).
Here’s the other one I did the same day:
And don’t worry, they never turn out the same way twice, no matter how hard you try… LOL
I really wanted to do the floral arrangements for my wedding, I love them that much, but my mom wouldn’t let me. Told me I’d have toooooooo much on my plate. Oh well 🙂


My grandma was a florist here in Kentucky her whole life. She owned her own little shop and when I was younger I used to work for her. It was always a lot of fun. I wish so bad sometimes that when she sold it due to sickness I had been in the financial situation to buy it. Over the years I have really missed that place.
OMG! That arrangement is beautiful Nicole! Seriously, you have a wicked talent!! xo
OMG! That arrangement is beautiful Nicole! Seriously, you have a wicked talent!! xo
OMG! That arrangement is beautiful Nicole! Seriously, you have a wicked talent!! xo
I would love to take a flower arranging class! How fun!
You make it sound so simple! I have tried to make arrangements and it's not pretty! Good tips though- encouraged to try again.
That looks so awesome!
Now why did I never think of taking a class like that. Shoot. I might have to sneak into one of the hort classes now. 🙂
Love it! I think that would be fun.
WOW! Beautiful!!! You are sooooo creative and make things look so easy!
Stef at TooMuchToDoSoLittleTime.com
Oh how beautiful! And thank you for the great tips. That would be a fun class to take. Totally going to pin this!
I love flower arranging! My mom became a florist when I was in high school…I loved hearing/learning about what she was studying, and picking up tips of my own. Oddly, I now find myself incorporating some of the ideas I learned from her in photo composition 🙂