Blogging 101: Creating/Implementing a Button
I’m not claiming to be the Blogging Queen or anything. Heck I’m still just “hit & miss” -ing my way through this like the rest. All that coding jargon confuses me. I know very little about technical names. And yes, I’m married to an IT Man. He humors me. I act like I know what I’m talking about and he smiles & nods :). Sometimes we have interesting conversations at my house :).
But, I taught myself how to make a button. How to “code” it. etc etc. And now, I’m going to share my knowledge with you. I’m proud to say I figured most of it out on my own, with a little help from the hubster.
There are lots of different programs you can make a button in; Paint (the simple standard program on a windows based computer), Photoshop (Elements & regular for sure, not sure about Lightroom, don’t have that), Gimp, Paint.net, or the easy program of Picmonkey. Why did they have to close down Picnik? Another question for another day. But your list of progams could be endless… I’m sure there are some I haven’t thought of!
Ok, before you get started download this little white box. It is sized for 150×150 which is pretty standard for most blog buttons.
 |
| 150×150 (it’s right above these numbers… hard to see it, sorry!! |
Right click above “These numbers” and you should find it… how the heck can I get a box around it so it shows up?
If you can’t get that to work, you can always go into, say Paint, Resize the white box to 150×150 pixels, save it and you’re good to go!
Ok moving on….
Now go to picmonkey.com make sure you spell it right or it doesn’t work. Learned that the hard way :).

You’ll click on Edit a photo and it pops up the dialog box where you select the photo. This is where you want to select your 150×150 white square.

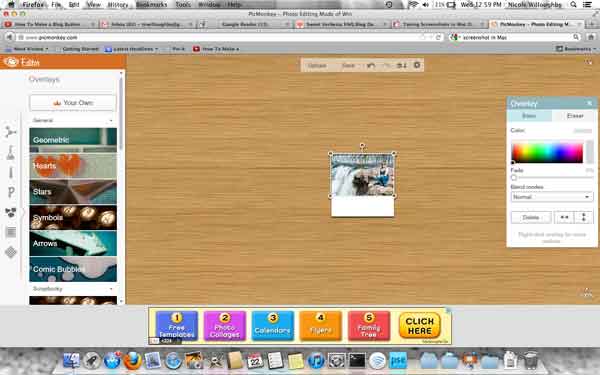
Now your screen should look like this. On the far left you see those symbol looking things. Go to the 5th one down (right below the P) and that is your Overlays. Choose Overlay.

Now it gives you all kinds of options as you can see (geometric, hearts, stars, symbols, etc) No one says your button has to have a photo of you, but if you have a symbol or emblem or logo saved to your computer or you want to use a photo, select Your Own. It will pop up and tell you something about for now you can use royalties free. I think you have to click ok, but when you click on Your Own, that allows you to get your picture. I chose a photo of me as you can see.
It brings it in small. Grab the corner and move it out. That keeps it proportional. If you want to distort it, hold the Shift button and drag the corner. I went for proportional.
Next I wanted to add text. I clicked on the P. (That’s your text, but that might be a captain obvious moment there…) Click the “Add Text” box and it places a box right in the middle of your photo. No problem, move your mouse until you get the 4 way arrow looking thing and move it where you want it. Btw, that top circle, that allows you to turn your text. Something to keep in mind if that floats your fancy :).
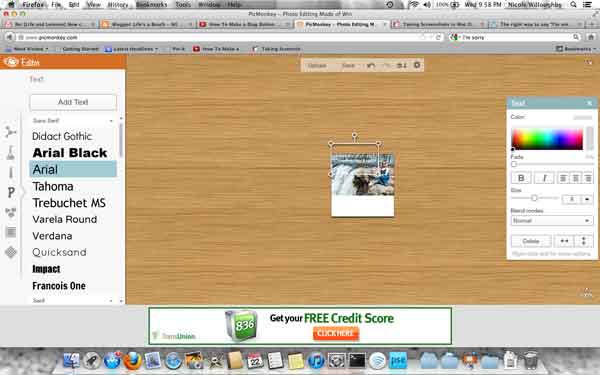
Once you have your text, one of two things, choose your font first or… select all your text after typed and then choose your font.
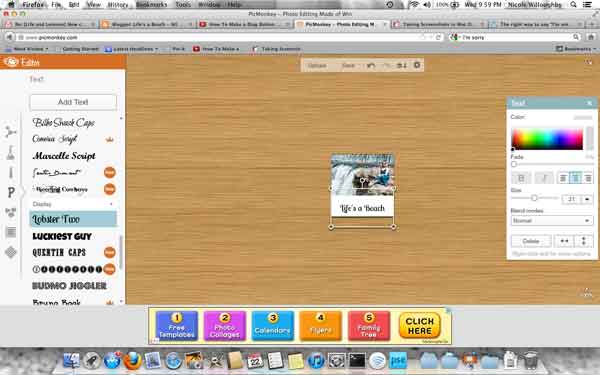
And there’s my button. Now in the previous shot you’ll see “Save”. Once you click on that it opens the save up on the left side of your screen. Save your button to a name you like.
Tip: My picture is small so you may not be able to see I have spaces in my button name, however I learned a trick after I did this that some websites don’t like spaces, so use the underscore (_) as your space holder.

Once you hit save again it pops up this little box. Click save and choose where you want it saved. I generally save into a folder called Staging Folder when it is things having to do with the blog :).

Ok button is made. Cool right? Are we done? Nope, sorry to burst your bubble.
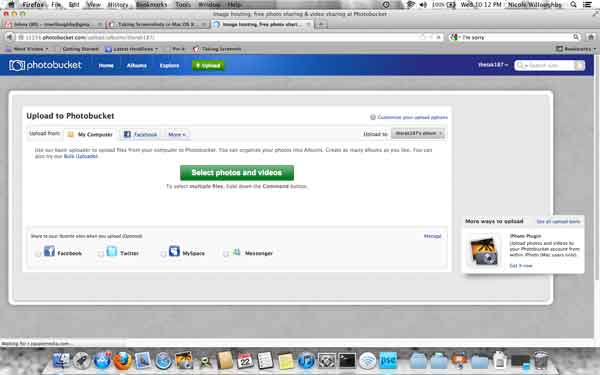
Now you need to go sign up for a free Photobucket account if you don’t already have one. I had one, and told it to remember me so I was already signed in. This isn’t the opening page. Click on the green Upload button there kind of in the center and it takes you here. Now click the green Select your photos & videos button and upload the button name.
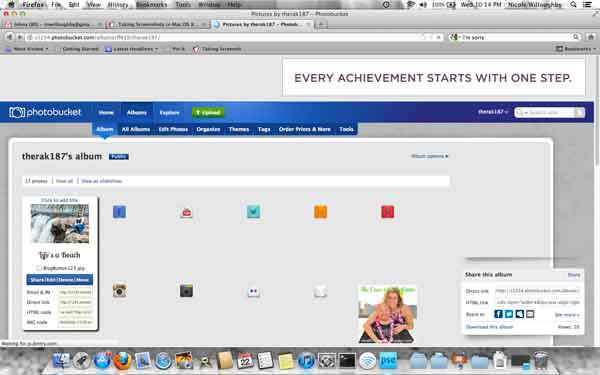
When it’s finished you get a screen like this. Click view album.

Now you can see my photo is in there. If you hover over it, it gives this drop down box with all these different codes. Click on the Direct Code and that saves that code for you. You’ll need to save that code… but if you have your internet browser (ie, firefox, google chrome) set up where it has multiple tabs, just keep this tab open so you can come back and get that code.
Whew! With me so far? Sorry this is a long winded post!
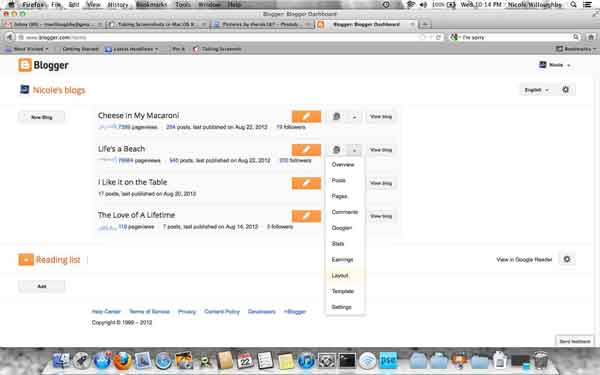
Now go into your blogger account. Click on the little down arrow next to your blog and select Layout.
And it takes you to this page. I have columns on both sides of my body (post) so I chose the left side. Wherever you choose to house your blog button though, click on Add a Gadget.

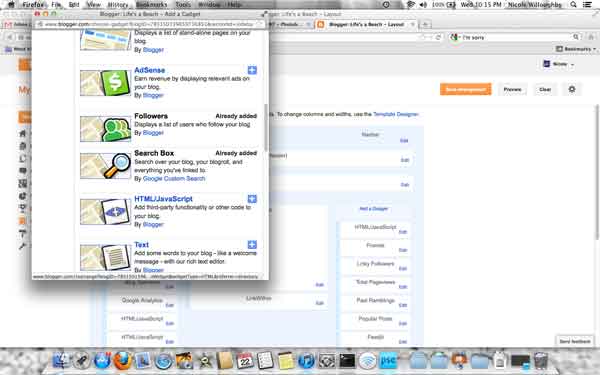
It pops up a box like this. Go down to HTML/JavaScript and click the plus out to the right side.
It pops you up a box like this. Now, paste the code below (with changes) in this box.
Tip: if you’re adding multipe people’s buttons to your blog (sponsors, blogs I follow, etc) you use the same Html/JavaScript and then click on “Rich Text” To double check they are all the same width…

Then click save, arrange it by dragging it in the order you’d like your blog button to show. And you are good to go.
Ok, below I have the code you’ll need to use. I have highlighted the areas you’ll need to replace with your code. The htt://yourblogaddress.blogspot.com is where you put in your blog web address. The other one that starts with http://i1234 is that code over in Photobucket. The next set down is the same way and the last piece highlighted is the first part of your photobucket code.
Make sure in the coding you leave all the “>=, etc and the spaces just like they are or it will mess up the coding. Html is that picky!
<a href=”http://yourblogaddress.blogspot.com“><img src=”http://i1234.photobucket.com/albums/ff419/yourphotobucketuserid/yourphotoname.jpg” border=”0″ /></a>
<p>
<textarea
class=”tiny” name=”1″ rows=”3″ cols=”18″><br /><a href=”http://yourblogaddress.blogspot.com/“><img
src=”http://i1234.photobucket.com/albums/ff419/yourphotobucketuserid/yourphotoname.jpg” border=”0″ /></img
src=”http://i1234.photobucket.com></a></textarea
class=”tiny”></p>
And now that I’ve bored you to tears, hopefully not, I’m out of here :). If you have any problems, please let me know!! Have a fabulous week!
Linking Up Here:
Creative Thursday
Made By You Monday
Mix It Up Monday
Shine On Friday