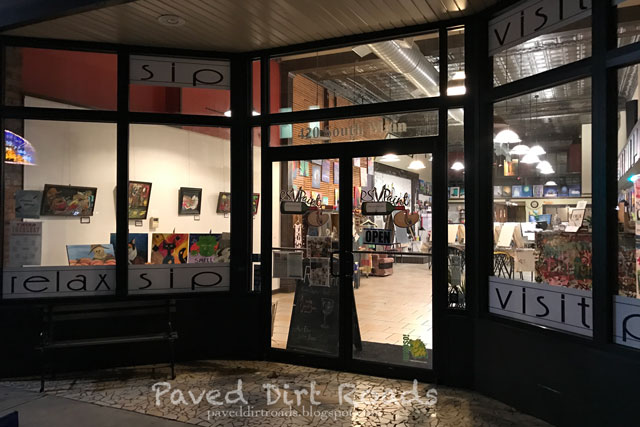
RSV Paint {Joplin, MO}

A blog that I’ve followed for years, Jill’s World, up in Canada started discussing how she and her friends were attending a paint night. I wondered what that was. Basically, she and a group of friends go to a place, learn to paint, and have fun. How awesome is that I thought. I figured something like that had to exist here in Southwest Missouri, right? I mean we’re not always the most cultural people but….

Not long after I read one of Jill’s posts, my friend Danielle asked if I’d be interested in doing that. I said sure but I’m not artistic at all! That’s no joke! Well nothing came about from that conversation. I didn’t know where to find it and she never said anything about it again so the dream kind of died… until…

My friend Jody posted something on Facebook one day that had something to do with a paint night. I shot her a message and asked if she knew anything about it and had done it. She said no, but she wanted to, so again, we started pursuing it, but this time she knew of a place in Joplin called RSV Paint.

So basically you go on line, sign up for a class, show up, and it’s a date! Now it stands for:

Relax. They say don’t get too uptight about your painting. Easier said than done….

Sip. Yes, you can sip wine, alcohol, do a shot, whatever. If you bring your own, there is a $5 cork fee for a bottle of wine or every 6 pack of beer you bring.

Visit. You’re amongst friends. We even had our instructor visiting with us about Kayaking, Canoeing, Fishing, SCUBA diving, and Riding horses.

and lastly Paint. Because well that’s the reason you’re there….

(more…)

Payton’s Creations

After this weekend, I’m not sure how I will recover. Wow! I’m exhausted! What was I up to this weekend? Well it was the 40th Annual Ride for Life to benefit St. Jude’s Research Hospital. One of the key things that they have at this fundraiser is an auction. My friend Jody donated a wreath to be included in the auction.

Guys, is this not a gorgeous wreath? Oh my! Is she talented or what? So I thought I would pick a few other of her creations (there are many gorgeous ones!) and share them with you.

Now, Did I pick this one…. Nope, she did. We might have gone to rival high schools. Can you guess whose school this was? (hint: Not mine….) But it’s so cute. If you were a teacher, wouldn’t you want a wreath like this in your classroom? Seriously! It just screams cutesie and back to school!

(more…)

Frame Family Recipes/Home Decor

Do you have that recipe that is near and dear to your heart? How about that recipe that your grandma or your great grandma wrote and you don’t want to lose…

Well have I got an idea for you… At our house that recipe is my grandma’s corn casserole. Truth be told, this grandma passed away in 2007, but I lucked out and she wrote the recipe down in her handwriting. That recipe is so dear to my heart because of that.

Since then we’ve made sure to incorporate it into a lot of family meals, because well it’s a way to keep grandma’s spirit alive. But how about another really cool way to keep grandma’s spirit alive… Why not frame it?

So for my birthday I asked for a photo frame. Initially when I did, I figured a 5×7 or maybe a 4×6, but my mom got me an 8×10. Well the recipe paper wasn’t that large so I started thinking, what to do, what to do?? Then it hit me. Why not use my photoshop skills…

(more…)

How to: Make a Korker Bow

Every now and then I get a crafty bone in my body… and this summer I thought it would be really fun to make Peanut a bow to wear in her hair. I decided I wanted to make her a multi colored Korker Bow. So I thought I’d take pictures along the way to show you how I did it. Super simple!!

Ok so you’ll need to get:

  • 3/8″ Grosgrain ribbon. I went with multi colored but you can do it all as one if you’d like.
  • Wooden clothes pins or something to secure the ribbon when it goes in the oven
  • Alligator Clips (or barrettes, whatever you plan on securing the bow to)
  • Scissors
  • Dowel Rods
  • Hot Glue Gun
  • Fray Stop (optional)
  • Poptart Box (optional)
  • Oven
  • Water
  • Spray Starch (optional)
  • Yarn, elastic cord or embroidery thread.

(more…)

Homemade Ornaments

I never really thought of myself as a baby person, but I’m really smitten with mine! And by the way, she’s growing up WAY. TOO. FAST! She hit a month old on Saturday. Really?  A month old :(. I have to tell you she was on her first horse at a month old… but shhhh don’t tell… lol :). I was too but again, don’t tell!… lol.

Anyway I wanted to do something to remember my baby as a baby so I went on pinterest after seeing that Katie had done the same thing and I found a recipe for a salt dough to make a Christmas tree ornament. Sweet!

My biggest fear is will it last? It did bake correctly and made a really cute ornament but I”m scared to death that it won’t last. Does anyone know??

Ingredients:
4 Cups Flour
1 Cup Salt
1 1/2 Cups water

(more…)

Picture Frame Chalkboard

A while back I was perusing some of my blogs I read and stumbled across Sarah’s blog where she shared a Picture Fame Chalkboard. It was such a cute idea and the teacher inside me really, really wanted one.

Recently my mother-in-law gave me a bunch of photo frames from an auction she went to and I knew I could sacrifice one just for this project.

What you need for this project:

A Photo Frame
Chalkboard Paint
A well vented area to use your spray paint

First things first, clean the glass out of the photo frame.  That’s what I used to put my spray paint on.

They have stuff you can put on with a paint brush but really I think the spray paint was the best option here.  It was fairly in expensive and I could spray a lot more things with this before running out.

And spray the glass.  I did this outside in our yard and placed cardboard under my glass so that I wouldn’t contaminate my glass or spray my yard up too much.

I put 4 coats on my glass.  Remember with spray paint to do very thin coats so that it doesn’t clump or run.  And give it a chance to dry between coats.  Also remember to stay about 8-10 inches away from the glass.

The spray paint can says to allow 24 hours for it to set up.  I let it set about 40 hours.  Life kind of got in my way, but I was super excited to pick it up yesterday morning.

Now Sarah’s instructions said to cover it in chalk and wipe it off.  If that’s what I’m to do, that’s what I did :).

Then I put it all together and here we are, a great place to leave a sweet note for my husband.  You could also use it at a dinner to let guests know what the menu is, what the dessert is, the entertainment, oh the possibilities are endless.  I’m super excited!

And just one blooper shot for your enjoyment.  The problem with taking photos outside at my house are the pooches are trying to get my attention.  What you can’t see is Marlie’s face is in my face and I wound up with a kiss planted on my cheek.  Yey 🙂

Happy Monday!

Linked up here:
Busy Monday 
Creative Thursdays
Friday Favorites
Get your craft on
Made by you Monday
Mix it up Monday
Say G’Day Linky Party 
Say G’Day Linky Party (b/c I forgot I linked this up with last weeks, sorry!)
Shine on Fridays 
Show me what ya got 
Show off your Stuff
Showcase Your Talent Thursdays
Take a look Tuesday
Trick or Treat Tuesday 
Tuesday Confessional
Tuesday Talent Show

Army Quilt

I’m fairly certain I’ve shared with you the quilts I made a few years ago, I just can’t seem to find the post right now.

So anyway, if you didn’t know I made quilts once upon a time, I made 2.  Well, I have material to make my hubby one that’ll be super cute, but I also stole some of his old military uniforms that he doesn’t wear anymore.  He had a few that he wanted to keep intact, otherwise, I got the rest and decided to make him an army quilt.  I don’t have a pattern, I’m just winging it.

In our house, we found a cutting mat so I told him for Christmas I wanted the squares and the running circular knife to cut material with.  Please don’t ask me technical names because I don’t know them.

And then you need material, or in my case, old army uniforms.  A guy I work with did this for his boss to give her brother in law (you know a friend of a friend of a friend of a cousin twice removed. ha!) and I saw the finished product, so I knew I had to make hubby one.

I bought these scissors specifically for cutting material.  But I get teased because the night I brought them home I said, “These scissors are only for cutting.”  Yeah, I haven’t lived that down yet.  {Listen here mister, this is for you, I’m just sayin}

But I love this b/c you use the circular blade, run it around the square and BAM {Thanks Emeril} you have uniform squares which are MUCH easier to sew together.


I’m not very far unfortunately because sometimes time is limited, but I just wanted to show you what I’ve been working on…. I can’t wait to show you the finished product!

Hand me a blanket, it’s a woppin 94 degrees

Okay, maybe not exactly what you need, maybe you need a pool or a cool shower or summer clothes but hey, maybe it got your attention and that’s what I was going for :).

Travel back with me a few years to the year 2007, late January. I just happened to be with my mom one Saturday morning (or maybe afternoon, I don’t remember) and we were at a quilt store. Now she doesn’t quilt but she does sew and she was working on something for me, but I can’t remember what and we were here looking for some material to round out whatever it was she was making me. So as I was walking around I saw the coolest material. It was (now don’t judge me) girls in bikinis on motorcycles. They looked like European made motorcycles. I just knew I had to do something with this material so we talked about it and a lady overheard us talking. Well, she said she was making her daughter a quilt out of similar material but it was hot guys with 6-packs, jeans, cowboy hats & boots standing next to old Chevy pickup trucks. I was intrigued and she happened to have the quilt with her so she showed me. I knew right then and there I was going to make my first quilt. Well actually I wanted to make the guys for myself but they said they couldn’t keep in the guy material. They also had male construction workers and female construction worker’s material. Not really my cup of tea but I was able to get on-line to this website and found the guys and ordered some. Anyway here are the 2 quilts I made.

First up, my very first, the ladies:

Some of the ladies here at work saw this one and thought I needed to enter it in a quilt show… so oddly enough, I did. My grandma hand quilted it and went around every lady & bike so they stood up too. This is just pictures of the top. I wanted to enter my male quilt, but it wasn’t quilted by the time the show came around. They told me at the show that it got A LOT of laughs and blushing older ladies. I could imagine b/c it’s wild compared to most quilts. Just think, my 70+-year-old grandma hand quilted it.

Now the male quilt I made myself:

I apparently have a thing for half-naked people quilts b/c I now have material to make my friend Evelyn one and PC. Evelyn’s will be Hawaiian guys in swim trunks with surfboards and PC’s is girls in short shorts with crop tops with Old European Sportscars.

I’ve been so busy with this wedding planning and house remodeling. I even bought enough of the Hawaiian guy material so I could make myself an apron :). But shhh don’t tell PC! 😉

Peace, Love, and um… cold weather (or hot) 🙂